
Using Cloudflare R2 with Node.js & aws4fetch for Image Uploads
Cloudflare R2 is a cost‑efficient, S3‑compatible object storage service with no egress fees and tight integration into the Cloudflare ecosystem. Perfect for serving public assets at scale, especially from custom domains managed by Cloudflare.
In this post, we’ll build a lightweight Node.js image storage solution using aws4fetch (an edge‑compatible AWS signer) and Jimp for resizing. We’ll walk through setup, common pitfalls, and why this stack works so well for production and edge scenarios.
Why Cloudflare R2?
- S3‑compatible API means migration is as easy as swapping access credentials and endpoints.
- No bandwidth charges make it attractive for asset-heavy workloads.
- Works seamlessly with Cloudflare CDN, especially when using a custom domain.
⚠️ Limitations to consider:
- Custom domain usage requires your apex domain to be managed by Cloudflare nameservers.
- R2 is single‑region, unlike Cloudflare’s globally distributed edge storage.
- You may need explicit CORS configuration for your bucket to allow cross‑origin access.
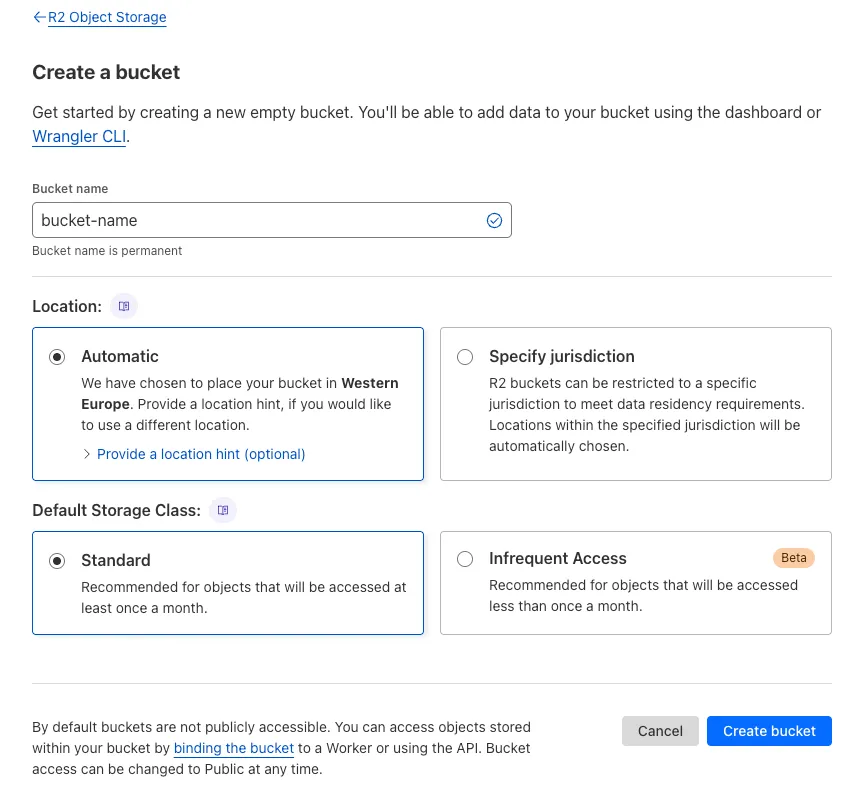
Step 1: Create the R2 Bucket
- In your Cloudflare dashboard, go to R2 → Create bucket.
- Pick a name, e.g.
my-assets, and region likeENAM. - If using a custom domain (e.g.
assets.example.com), it must be managed by Cloudflare, and you’ll need to configure DNS and routes pointing to the bucket.
Step 2: Build the Storage Client
We’ll use aws4fetch for signed requests and Jimp for image processing.
import { AwsClient } from "aws4fetch";
import { Jimp } from "jimp";
import { err, ResultAsync } from "neverthrow";

interface imageOptions {
  contentType?: string;
  width?: number;
  height?: number;
}

const R2_URL = process.env.R2_STORAGE_BASE_URL;

class StorageClient {
  private client: AwsClient;

  constructor() {
    this.client = new AwsClient({
      accessKeyId: process.env.R2_ACCESS_KEY_ID ?? "",
      secretAccessKey: process.env.R2_SECRET_ACCESS_KEY ?? "",
      service: "s3",
      region: "auto",
    });
  }

  async upload(
    key: string,
    body: Buffer,
    opts?: imageOptions,
  ) {
    const image = await Jimp.read(body);
    image.resize(opts?.width ?? 500, opts?.height ?? 500);
    const type = opts?.contentType ?? "image/jpeg";
    const buffer = await image.getBufferAsync(type as any);
    const blob = new Blob([buffer], { type });

    const headers: Record<string,string> = {
      "Content-Length": blob.size.toString(),
      ...(opts?.contentType && { "Content-Type": opts.contentType }),
    };

    const res = await ResultAsync.fromPromise(
      this.client.fetch(`${process.env.R2_STORAGE_ENDPOINT}/${key}`, {
        method: "PUT",
        body: blob,
        headers,
      }),
      (e: unknown) => err(e),
    );

    if (res.isErr()) {
      console.error(res.error);
      throw new Error("Failed to upload file");
    }

    return `${R2_URL}/${key}`;
  }

  async delete(key: string) {
    const res = await ResultAsync.fromPromise(
      this.client.fetch(`${process.env.R2_STORAGE_ENDPOINT}/${key}`, {
        method: "DELETE",
      }),
      (e: unknown) => err(e),
    );

    if (res.isErr()) {
      console.error(res.error);
      throw new Error("Failed to delete file");
    }

    return true;
  }
}

export const storage = new StorageClient();
Step 3: Uploading Images
Use the storage client like so:
const key = generateId(20);
const url = await storage.upload(`users/avatars/${key}`, fileBuffer, {
  contentType: file.type,
});
This resizes the image, compresses it, and uploads via signed request, returning a public URL.
Handling CORS
To embed assets (e.g. in QR codes or cross-origin contexts), set this CORS policy in your R2 bucket:
[
  {
    "AllowedOrigins": ["*"],
    "AllowedMethods": ["GET", "HEAD"],
    "AllowedHeaders": ["*"],
    "ExposeHeaders": []
  }
]
or if u want to secure it to only be able to read from a specific urls:
[
  {
    "AllowedOrigins": [
      "http://localhost:3000",
      "https://website.com"
    ],
    "AllowedMethods": [
      "GET",
      "HEAD"
    ]
  }
]
Why aws4fetch Over AWS SDK?
- Runs in edge runtimes (e.g. Vercel Edge, Cloudflare Workers) where AWS SDK doesn’t.
- Lightweight and focused: only signs requests, making it ideal for static-hosted/serverless environments.
Notes & Best Practices
- Resize & compress images before upload to reduce payload size.
- Use a custom domain + Cloudflare cache to accelerate delivery.
- Configure CORS early to avoid runtime errors in production.
Cloudflare R2 delivers S3‑like capabilities with cost-effective bandwidth handling. Paired with
aws4fetch, it’s ideal for modern edge + Node.js workflows.
Happy coding.